Thursday, December 22, 2011 at 12/22/2011 03:59:00 PM
2012 holds many new culinary adventures for Amanda and I, and we want to make sure we're sharing our stories as best we can. Since YOU'RE the one reading our blog, we'd love to hear your feedback! Let us know what works, what doesn't, and what you'd like us to feature on the blog. More health tips? more meatless recipes? more reviews?
Answer our 8 easy questions and let us serve you better in the year to come!
Thanks for your feedback!
Monday, December 19, 2011 at 12/19/2011 11:17:00 AM
This week end, A hosted his hockey team (and a few more friends) for our - now annual - Christmas potluck dinner. Everyone brought some amazing dishes to the table, meaning there was definitely enough food to fill up our 21
little gluttonous bellies! Among them, my
mamma's turkey recipe was a big hit!
There was so much food however, that there was A LOT of turkey left over. As much as I love my turkey, there was no way I was going to finish the portion I took home with me (which was essentially half the turkey meat) - especially with C going back home for the holidays. That's why I decided to make turkey pot pies that I could freeze and eat when I have lost all my energy from eating too much over the Christmas break.
Using a filling I found on
allrecipes.com, I made the most amazing turkey pot pie. Granted it's not the healthiest one (with close to 500 calories per serving - although it does contain some good veggies and lean meat), but it's definitely one that everyone could appreciate. For the crust, I used the dough I made for the
spinach pies, which turned out to be more of a bread than a pie crust, but it still turned out delicious! :)
Here we go. For the filling of 2 pies
(because the 1 dough recipe is enough for 2 pies):
- 1 dough recipe, or any pie crust recipe you prefer
- 4 tablespoons butter, divided
- 2 small onions, minced
- 4 stalks celery, chopped
- 4 carrots, diced
- 4 tablespoons dried parsley
- 2 teaspoons dried oregano
- salt and pepper to taste
- 1 1/2 cups of chicken stock
- 6 potatoes, peeled and cubed
- 3 cups cooked turkey
- 4 tablespoons all-purpose flour
- 1 cup milk
- 2 pie shells
- If you don't have already made dough/pie crust, make that first and set aside for an hour and a half (as per the recipe).
- In the meantime, melt 2 tablespoons of butter in a large sauce pan over medium heat; add the onion, celery, carrots, parsley, oregano, and salt and pepper. Cook and stir until the vegetables are soft. Stir in the chicken stock. Bring mixture to a boil. Stir in the potatoes, and cook until tender but still firm.
- In a medium skillet, melt the remaining 2 tablespoons of butter. Stir in the turkey and flour. Add the milk, and heat through (yes, you've just created a turkey bechamel sauce. delish!). Stir the turkey mixture into the vegetable mixture, and cook until thickened and remove from heat.
- Preheat your oven to 425 degrees F.
- Once your dough is ready, split it in 4 parts. Roll out 2 parts into bottom crusts and place them in your pie shells.
- Pour the turkey mixture into the unbaked pie shell. Roll out the top crusts, and place on top of the filling. Flute edges, and make 4 slits in the top crust to let out steam.
- Bake in the preheated oven for 15 minutes. Reduce oven temperature to 350 degrees F, and continue baking for 20 minutes, or until crust is golden brown.

Enjoy your delicious pies or bring them over when you visit family and friends during the holiday season, along with a good bottle of
Chardonnay! :)
Happy holidays everyone!
- CK

Wednesday, December 14, 2011 at 12/14/2011 01:08:00 PM
Unquenchable by Natalie MacLean
Doubleday Canada, 2011
$29.95 CAN (also available as an ebook) 356pp
Though CK and I throw back our share of the red wines in this world (and have a damned good time doing it too! Not to mention the actual “wine-throwing” incident...), we’ve both always not-so-secretly wished that we knew more about the wines we were buying and drinking. We both love to learn, and wanted to understand what makes a wine tick, and how to get the most out of any delicious experience (and maybe more importantly, how to turn wines that make us screw up our faces into wines we love by pairing them more appropriately), but we also both really appreciate the bigger picture that contextualizes our purchases, particularly those that go in our mouths. We needed help, particularly as the wonderfully wine-soaked holiday season approached.
 |
AGerman Riesling and Argentinean Malbec:
two delicious wines recommended in Unquenchable |
Enter Natalie MacLean’s latest read, Unquenchable: this journey through 8 wine regions, with blessedly specific emphasis on local treasures, serves up a delightful blend of personal travel narrative, wine tasting, pairing, and (best of all) drinking tips for the aspiring oenophile. The book is made mighty by a really satisfying socio-cultural and historical exploration of the worlds and conditions (not to mention a good dose of accessible and fascinating scientific explanation) that bring some of MacLean’s favorite wines to life. Readers who care more about where their wine is really from, and who put their heart, souls, (and sometimes fingers or feet) into it, more than what’s on the label description, will be truly grateful for this human side of wine. Moreover, this isn’t one of those books that will make you feel shabby about your 10$ safety-net Shiraz; instead, Unquenchable is all about introducing the reader to remarkably budget-friendly vintages from around the world. MacLean pulls even the most impressive wines down off their lofty pedestals, turning them into stories and experiences best shared with friends and family, in sloshing raised glasses, to hearty toasts, and belly cheer. Her travels and discoveries are punctuated by memorable information, and followed up by helpful short lists of the chapters’ best value products and producers, sure-fire food pairings, and other handy tools to take to the liquor store.
 |
Argentinean malbec from Mendoza paired
with cheddar cheese and dark chocolate |
Other novice wine readers like ourselves might feel a tad disoriented by what is probably very basic wine language, and might regret the lack of a glossary, however one of the perks of Unquenchable is that it prefers storytelling over taxonomy, and so even the newcomer to the ins and outs of wine will feel at home. That being said, having a dictionary (okay, the internet) on hand, will give readers quick insight into what things like tannins are. Though, even without definitions, the stories soon compensate for any vocabulary that isn’t immediately obvious.
Unquenchable will reignite the desire for new experiences in anyone who has settled into a stable wine routine, and will give you lots of good reasons to try things you never thought you would. MacLean makes pairing easy and exciting (thanks to a beautifully written chapter about Argentina, CK and I are currently recovering from an Argentinean-Malbec-and-cheddar-cheese-bliss-coma that everyone should try at least once), and leaves the reader room to make the experience of wine choosing and drinking as thoughtful (or as purely sensual) as they want it to be.
Unquenchable makes a great holiday gift for any wine lover this year, and is an excellent addition for anyone who loves to travel. Be prepared: it’s not only your yen for wine culture and experience that will become unquenchable, but also your desire to see the places MacLean gifts to her readers in such living detail. Natalie MacLean’s thirst for life and living is part of the true pleasure of this read, and it’s a pleasure we hope she’ll keep on sharing.
Unquenchable is ripe for the picking at your local book retailer or online at http://www.nataliemaclean.com/, where you can find lots of other great resources.
at 12/14/2011 10:37:00 AM
Posted by CK in
beef,
potato,
recipe,
stew
Winter cold hasn't really hit us yet, but here in Canada, that only means very cold months ahead. That's why this hearty beef stew is the perfect dish for those upcoming cold winter evenings. It'll warm you up and fill you up so you can go to bed satisfied.
This very simple recipe, that I slightly changed from
this one, requires:

- 2 to 2 1/2 pounds very lean beef stew meat
- 2 tablespoons oil
- 2 cups chopped onions
- 1/2 cup sliced celery
- 5 large potatoes, cut in eighths
- 4 or 5 large carrots, cut in 2-inch slices
- 1 teaspoon of 7 spices (this can be found in middle eastern markets. If you don't have this, you can simply use pepper).
- salt
- 1 can condensed tomato soup
You can either prepare this in a Crockpot or on the stove top. I did it on the stove top and this is what I did:
- In a large pan, brown stew meat in oil.
- Add chopped onions and sliced celery and cook until tender.
- Add vegetables and 7 spices.
- Add soup and a soup can of water.
- Simmer over lowest heat for about 2 to 2 1/2 hours, or until meat and vegetables are tender. Add more water as needed.
Crockpot Directions: Do steps 1 and 2. Then, transfer the mixture into the Crockpot along with all other ingredients, cook on LOW for 8-10 hours or on HIGH for 5-6 hours. Add water if necessary.
Enjoy!
-CK
Tuesday, November 29, 2011 at 11/29/2011 12:32:00 PM
Amanda and I are big fans of Thaï food - I'm particularly a big fan of pad thaï, minus the excessive amount of calories (pad thaï portions in restaurants can rack up to 1500 calories!!!). In the homemade version I made last night, I'm positive that while the calorie count can be slightly high, it is nothing compared to what you'd find in a restaurant and it pretty much tastes the same as a bonus ;)
So without further ado, go ahead and try this at home:
Ingredients:
- Magical pad thaï sauce:
- 1/2 cup soya sauce (if you have the reduced sodium kind, even better)
- 1/4 cup of lime juice
- 1/4 cup of sugar
- 1 1/2 tbsp of peanut butter
- The rest:
- 1/3 pack of flat noodles (or whatever you have on hand)
- 10 regular sized uncooked frozen shrimps
- 2 celery stems, diced
- 2 smalls carrots, diced
- 2 garlic cloves
- 2 egg whites
- vegetable oil
Preparation:
- Soak your frozen shrimp in cold water for about 10 minutes (long enough so that it's easy to peel the shell off).
- Cook the pasta according to directions on the package.
- Next, scramble up the egg whites in a small skillet and put aside.
- While all this is happening, get your pad thaï sauce mixture ready and put aside.
- Mince the garlic cloves and fry them up in a wok for about 2 minutes.
- Remove the shell from the shrimp and add to the garlic.
- Once the shrimp is almost cooked (almost fully pink), add the celery and carrots and cook for about 3 minutes.
- In the meantime, your pasta should be ready. Once it is, drain and add to the wok along with the eggs, mix well for about a minute or so.
- Add the magical pad thaï sauce to the mixture and mix well until everything is well coated and the peanut butter has melted.
Additional options: You can add red pepper flakes for spiciness and peanuts if you want more authenticity (by authenticity, I mean restaurant style - I'm also quite positive this is not close to what we'd get in Thaïland...). For meat-eaters, add beef or chicken & for vegetarians, add some tofu (or replace the shrimp with tofu)! :)
This dish is great because it has so many variations. Plus, it only took around half an hour to cook (including prep time) and yielded about 3 portions.
Enjoy!
-CK
Tuesday, November 22, 2011 at 11/22/2011 12:34:00 PM
Don't you love a nice pasta with a thick rosé sauce? I know I do. I would even be willing to say that it is my favorite pasta sauce! However, the amount of calories and fat that the usual whipping cream adds to this delicious recipe don't mesh very well with my fragile heart.
I've searched for a long time for the perfect rosé sauce that could be a little more helpful to my low-cholesterol diet when I finally ventured into the following recipe which I find turned out absolutely fantastic and filling. I'm sure there are healthier recipes out there (please do
e-mail us if you have an even healthier alternative), but so far, this one will definitely work for me!
Ingredients:
 |
| I know, doesn't look very rosé but it sure tastes like it! |
|
- 1 small onion, diced
- 1 tbsp olive oil
- 2 small cloves of garlic, minced
- 5 white mushrooms, diced
- 2 medium cans of Aylmer tomato soup (or any other tomato soup you have on hand)
- 2 tbsp tomato paste
- 2 tbsp light cream cheese
- 3 cups pasta (of your choice)
Get it done:
- Start by caramelizing your onions in your olive oil in a large sauce pan.
- Once your onions are almost done, add the garlic and fry for about 30 seconds.
- Add the mushrooms to the mixture and fry for another 30 seconds to a minute.
- Add the two cans of tomato soup and the tomato paste. Stir well, lower heat and let simmer for about 5-10 minutes.
- While the sauce simmers, cook your pasta according to directions on the package.
- Add the cream cheese to your tomato sauce and mix until the cheese has melted into the sauce - about 10 minutes. You can let simmer for another 5 minutes or so.
- Pour the sauce over your pasta on a plate and eat the hell out of it!
Enjoy!
-CK
Thursday, November 17, 2011 at 11/17/2011 12:31:00 PM
Some of you may have already seen kousa - a Lebanese dish that is essentially stuffed zucchini. In an attempt to reach out to my roots again, I decided to buy zucchini on my last grocery trip. Unfortunately, when it came time to cook the deliciousness that is kousa (last night), it seemed I was lacking many of the ingredients necessary to make it what it is (mainly meat).
That's when I remembered my mom's inside out kousa dish that I absolutely LOVE! Basically, it contains all the ingredients you'd find in the traditional dish, but the zucchini is diced into the mixture instead of stuffed.
Lacking said meat, my mom and I came up with a great vegetarian alternative! Here we go:
Ingredients (yields about 6-8 regular portions):
- 1 medium onion, chopped
- 4 medium-large zucchinis, diced
- 2 cups of brown rice
- 2 medium tomatoes, diced
- 2 tbsp dry parsley
- 4 1/3 cups water
- 1 garlic clove, minced
- 3 tbsp olive oil
- 2 tbsp lemon juice
- salt and pepper to taste
Preparation:
- In a large pot, pour 1 tbsp of olive oil and lightly fry the onion (about 2 minutes).
- Add your diced zucchini to the pot over your onion and mix well.
- Cover the mixture flush with water (around 3 cups) and let boil until you can insert a fork in the zucchini with ease.
- Drop in your brown rice while adding 2/3 of a cup of water per cup of rice (around 1 1/3 cups). Mix well.
- Add in your diced tomatoes and your dry parsley. Mix well and let boil for a few minutes.
- In the meantime, in a small bowl, mix your garlic, 2 tbsp of olive oil and lemon juice. Once that's done, pour it in your rice mixture and mix well. Side note: This mixture can also be used as a great light and simple salad dressing!
- Cover the pot and lower your heat to let the rice cook.
- Your dish is ready once your rice is ready. If you WANT to pile up the carbs, eat it up with whole wheat pita bread - absolutely fantastic! ;)
*Carnivorous option: Before dropping in your zucchini, cook ground beef really well (the quantity you like) , then add the zucchini and continue with following steps. In this alternative, the tomatoes are optional, and you can use dry mint instead of parsley.
*Note: The quantities for this inside-out kousa are different from regular kousa. I haven't given it a try yet but you're more than welcome to leave comments on how you'd make yours! :)
Enjoy!
-CK
Tuesday, November 15, 2011 at 11/15/2011 11:56:00 AM
Once again this year, Martha Stewart gathered great cooks and is providing everyone with her free e-cookbook! All the recipes look absolutely fantastic and there are a lot more vegetarian choices this year for a meat-free holiday season!
Click here to enjoy great recipes!
Tuesday, October 25, 2011 at 10/25/2011 12:01:00 PM
B, A and I got together for a potluck last week and we each came up with
amazing dishes that filled our tummies! :) This salad is very simple but oh-so-delicious! If you're missing the freshness of summer, this is the salad for you.
You'll need:
- 2 medium tomatoes, diced
- 1 large cucumber, diced
- 4-5 tablespoons of natural yogurt (depending on the constistency you like)
- 2 teaspoons of dry parsley
- 2 cloves of garlic, minced
- Toss your diced tomatoes and cucumber into a bowl
- Mix yogurt, dry parsley and garlic into a small bowl to make your dressing. I recommend doing it separately so you can add garlic, yogurt or parlsey to taste before mixing it up with your veggies.
- Pour your dressing onto your vegetables and enjoy!
Perfect for a last minute salad or last minute dish!
- CK
Monday, October 17, 2011 at 10/17/2011 03:51:00 PM
Posted by CK in
restaurant,
review
For the occasion of a birthday party last weekend, C and I trotted ourselves down to
Stella Osteria, a contemporary Italian restaurant in the heart of downtown Ottawa.
While the restaurant has been around since 2006, our tourist tunnel vision hadn’t spotted it yet, as we are both originally from Montreal.
When we first walked in, we were very pleased with the modern décor and atmosphere. The earth tones of the restaurant, complemented by red and black accessories, really give it an edgy modern feel. The small size of the restaurant builds on the cozy and charming ambience created by the rooms’ colour palette.
As the very friendly hostess sat us at our table close to the bar area – where people can also sit and eat on the go - we noticed that ours was the only one left to be filled. At that point, we were already very much looking forward to trying out their Italian dishes!
When it was time to order, C and I had made our choices from the menu which mainly concentrated on Italian dishes: prices range from 13$ to 27$ for main courses. I personally like it when there aren’t too many choices on a menu as it makes it much easier to choose from. In my opinion, the 7-8 choices per type of dish (pizza, meats, pasta, etc.) were just enough.
C’s
Pizza a la funghi (13$) looked like it was fresh out of the oven and the ingredients looked like they were just picked from the garden. The lightness of the dish (no, I couldn’t resist having a bite!) definitely makes it a great choice for our list! The flavours meshed very well together, making it one of the best flatbreads I’ve had the pleasure to taste in a long time.
As for me, my
Penne with mushrooms (16$) was to die for! The sauce wasn’t too oily and it looked like a very healthy pasta salad. Again, the veggies looked like they were picked right out of the garden! The only reason I didn’t finish my plate was because the portion was larger than anticipated – an added value for a luxury spot!
We topped off our delicious meal with a shared half litre of red wine, which we enjoyed down to the very last drop.
Stella is a great place for any occasion - from a girl’s night out to a romantic date night with your significant other. Each corner of the restaurant has its own unique charm!
All in all, the service was absolutely delightful and the waiters/waitresses were very patient and friendly with us. The quality of the food vs. the cost definitely surpassed our expectations and we would go back in a heartbeat!
Stella Ostaria is located at 81 Clarence Street in the market. You can view their menu and make a reservation directly on their website:
http://www.stellaostaria.com/.
Enjoy!
-CK
Saturday, October 8, 2011 at 10/08/2011 02:02:00 PM
This salad is really easy, and could be made really beautiful with a little careful pear-placement. I tend to go right in for chaotic salads, but you could make something quite pretty out of this one.

For the dressing, whisk together
3 parts olive oil
1 part balsamic vinegar
.5 tablespoon whole grain mustard
1 tsp brown sugar
a dash of salt
(These are my preferred ratios, and probably makes enough for two servings, however give it a shot and adjust to meet your own needs and tastes)
Drizzle this over
2 bartlett pears, sliced very thin, length-wise (one per person)
1.5-2.5 cups baby spinach per person
Once dressed, toss in half a cup of freshly grated parmesan (though not pictured here, shaved parmesan "petals" make for a sharper, more assertive parmesan presence that is super delicious. Saputo Parmesan Petals are my flowery cheese source of choice!).
Serve immediately
Monday, October 3, 2011 at 10/03/2011 12:38:00 PM

Wow! It's been a while since we posted a recipe on the blog! This summer has been a hectic one for all of us here at Stute Kitchen! So much so that we barely even had time to cook! But fall is here and warm and cozy recipes are definitely on the menu. To start off the parade, here's a great recipe that was thrown together last night for supper and turned out to be delicious! :)
Ingredients:
- 1/2 onion (chopped)
- 1 large zucchini (chooped into quarters)
- 5 sausage links (chopped into small pieces)
- half a box of mushrooms (chopped)
- 4-5 garlic cloves (minced)
- 1 1/2 teaspoon of basil
- 1/2 cup of white wine
- 2 tablespoons of olive oil
- Half a box of whole wheat spaghetti (or any pasta you like)
*Feel free to add any other vegetables you enjoy
Preparation:
- Boil water and cook pasta according to instructions.
- In the meantime, heat 1 tablespoon of olive oil in a large skillet and cook the sausage until golden (approximately 3-4 minutes). Once cooked, put the sausage aside.
- In the same skillet, add a tablespoon of olive oil and cook the onions for 2-3 minutes.
- Add the garlic, mushrooms and zucchini and mix until the vegetables are cooked.
- Add the white wine and mix for about 3 minutes, then add the basil and mix for another minute or two.
That's it! Serve the "sauce" over pasta and you get a delicious hearty dish! :)
Enjoy!
-CK
Thursday, August 11, 2011 at 8/11/2011 06:52:00 AM
Welcome to Stute Kitchen's first Recipe Linky Party! This is our first time trying it out and we're looking forward to the great recipes you will be submitting!
The concept is fairly simple, add a link to your recipe blog below to share with others the great things you are cooking in your kitchen! The purpose? To share with everyone around the world (hopefully) the things that you love to cook for others to enjoy in their kitchen. It's great right??
As Stute Kitchen is comprised of both vegetarian and carnivorous parties, we hope to see all kinds of recipes to flatter our appetite - AS WELL AS YOURS!
Monday, August 8, 2011 at 8/08/2011 12:38:00 PM
Go read your peanut butter jar. Consider that all nuts
naturally contain oils and therefore fats, and now think about where sugar factors into your jar's list of ingredients. We all desperately
want peanut butter to be good for us, but the reality is that it just isn't a great option if you're going to be eating a lot of it (but everything is delicious in moderation..right?). Possibly your jar of
natural nut butter contains only crushed nuts, and if so, good on you because that is an important move to make if you're going to avoid trans fats and things you can't pronounce. BUT, it's also probably you paid anywhere from 8 to 12 dollar for that butter, and we all know that the natural ones come in teeny jars (sad).
My proposition is this: buy nuts, blend, eat butter. The only necessary ingredient in any nut butter is the nut itself, because nuts are a generous gift from mother nature that we have mercilessly corrupted and mindlessly slathered on unsuspecting bread. Hazelnuts are an excellent butter nut because they are so naturally sweet, not to mention high in important vitamin Bs, however if you want to make your nut decisions based on things other that that (though other nuts are sweet too, macadamia and almond being big frontrunners in that category), or use the spread for savory sandwiches (not to say that hazelnut isn't a good option here either), check out
this chart. Cashews are next on my list.
 |
| Delicious, but not photogenic |
But today, I made my own hazelnut butter. Here's what you do: The short version is
1. roast nuts
2. grind nuts
3. eat nuts.
Here is my annotated version:
- Preheat your over to 275. Nuts burn easily, so keep it low if you know your oven runs hot.
- Lay your hazelnuts out on a baking sheet. You'll basically get half as much butter as you have nuts, so gauge accordingly. Natural butters have no preservatives and a short shelf life, so it's better to make a little at time, or freeze your excess if you make more than a cup of butter.
- Roast your nuts for 15-25 minutes. I know this seems like a wide range, but you need to asses your own batch based on how they're doing (the range is determined from different numbers I've seen across the internet...I roasted mine for about 17 minutes). You'll know they're done when they are fragrant and the skins are cracking. A burned nut is a terrible (and disgusting) thing, so be careful.
- Let cool for a few minutes, then, by rubbing handfuls of nuts between your hands in a dishtowel, remove the skins. (This is messy, but the skins get very bitter during roasting, particularly with other nuts. I kept a few skin-ny ones because I like the extra texture and it really didn't have a negative impact on the flavor at all)
- Grind roasted nuts in a food processor or blender (I used my 4-cup Cuisinart and it was great...I've read that if you're using a blender you should toss in a tsp of oil, but I'm not sure why this is...water might work just as well...I had no problems though.)
- Note: the less you try to process at one time, the easier the oils will come out to make a spread, so I ground it all once, to a crumbly spread, then ground it in half cups again, adding more when the first bit became oily, which happened fast.
Refrigerate. Well, eventually. I highly recommend you eat a bit right away, because your appliance will have warmed it up and...damn. It's so good. Please try to remember you are actually eating nuts. Your waistline and your digestive system will thank you for your mindfulness.
 |
| Cocoa is a great source of protein and zinc, but is high in saturated fats (but don't believe everything you hear...the verdict is still out on saturated fats, because so much depends on its composition) |
For a chocolate-y variation, add to 1 cup of hazelnuts before blending:
1/4 cup cocoa
5 tbsp of sweetener (the recipe I'm using asks for agave nectar, so use less if you're using sugar, and just adjust according to taste...my advice is to do this AFTER you've blended the cocoa and extract, and add in small quantities, as hazelnuts are delicious and their unique flavor really doesn't need to be steamrolled with sweetness)
Taste, and if you're not satisfied, add a pinch of salt.
This would probably be divine in almond butter too.
And voila! You are now a master butter maker! Eat it with confidence!
love,
A
Monday, August 1, 2011 at 8/01/2011 04:33:00 PM
It's always difficult for a non-vegetarian to find good tofu recipes. In my attempt to try and find something that both vegetarians and carnivores will like, here is a delicious recipe I stumbled upon on a
vegetarian blog. Since I didn't have everything the author called for, I've omitted some ingredients Tasted great, was quite easy to make and can be eaten with a variety of sides! In addition to a pack of extra firm tofu, you'll need the following ingredients for the marinade:

- 1 Tbsp of balsamic vinegar
- 1 Tbsp of olive oil
- 1 Tbsp of soy sauce
- 1 tsp sugar
- 1/2 tsp ground ginger
- 1 Tbsp minced fresh garlic
- 1/2 tsp cumin
- 1/2 tsp coriander
- fresh ground black pepper
Marinating and Baking the tofu:
- Put all the marinade ingredients in a bowl and mix well
- Press the block of tofu between an old dishtowel or paper towels to remove any excess water
- Slice the tofu in 1/2 inch slices, and lay side-by-side in a flat baking pan
- Spread the marinade over and under the tofu slices
- Cover and marinate 30 minutes or more in the fridge, turning once or twice if possible
- Preheat the oven to 375 degrees
- Bake 30 minutes
- Turn over halfway through the baking
- Less baking time, if it looks very done halfway through
- Broil for a few minutes on each side to give the baked tofu a crusty finish
Had it with a side of brown rice and green beans. Delicious and healthy! :) I'm planning on making sandwiches with the left overs for lunch tomorrow. With some Dijon mustard, mushroom and spinach. Already can't wait to try it out!
Enjoy!
-CK
Monday, July 25, 2011 at 7/25/2011 05:06:00 PM
Posted by amanda in
budget,
chicken,
grill,
kabobs,
onion,
peppers,
recipe,
sauce,
shrimp,
skewers,
zucchini

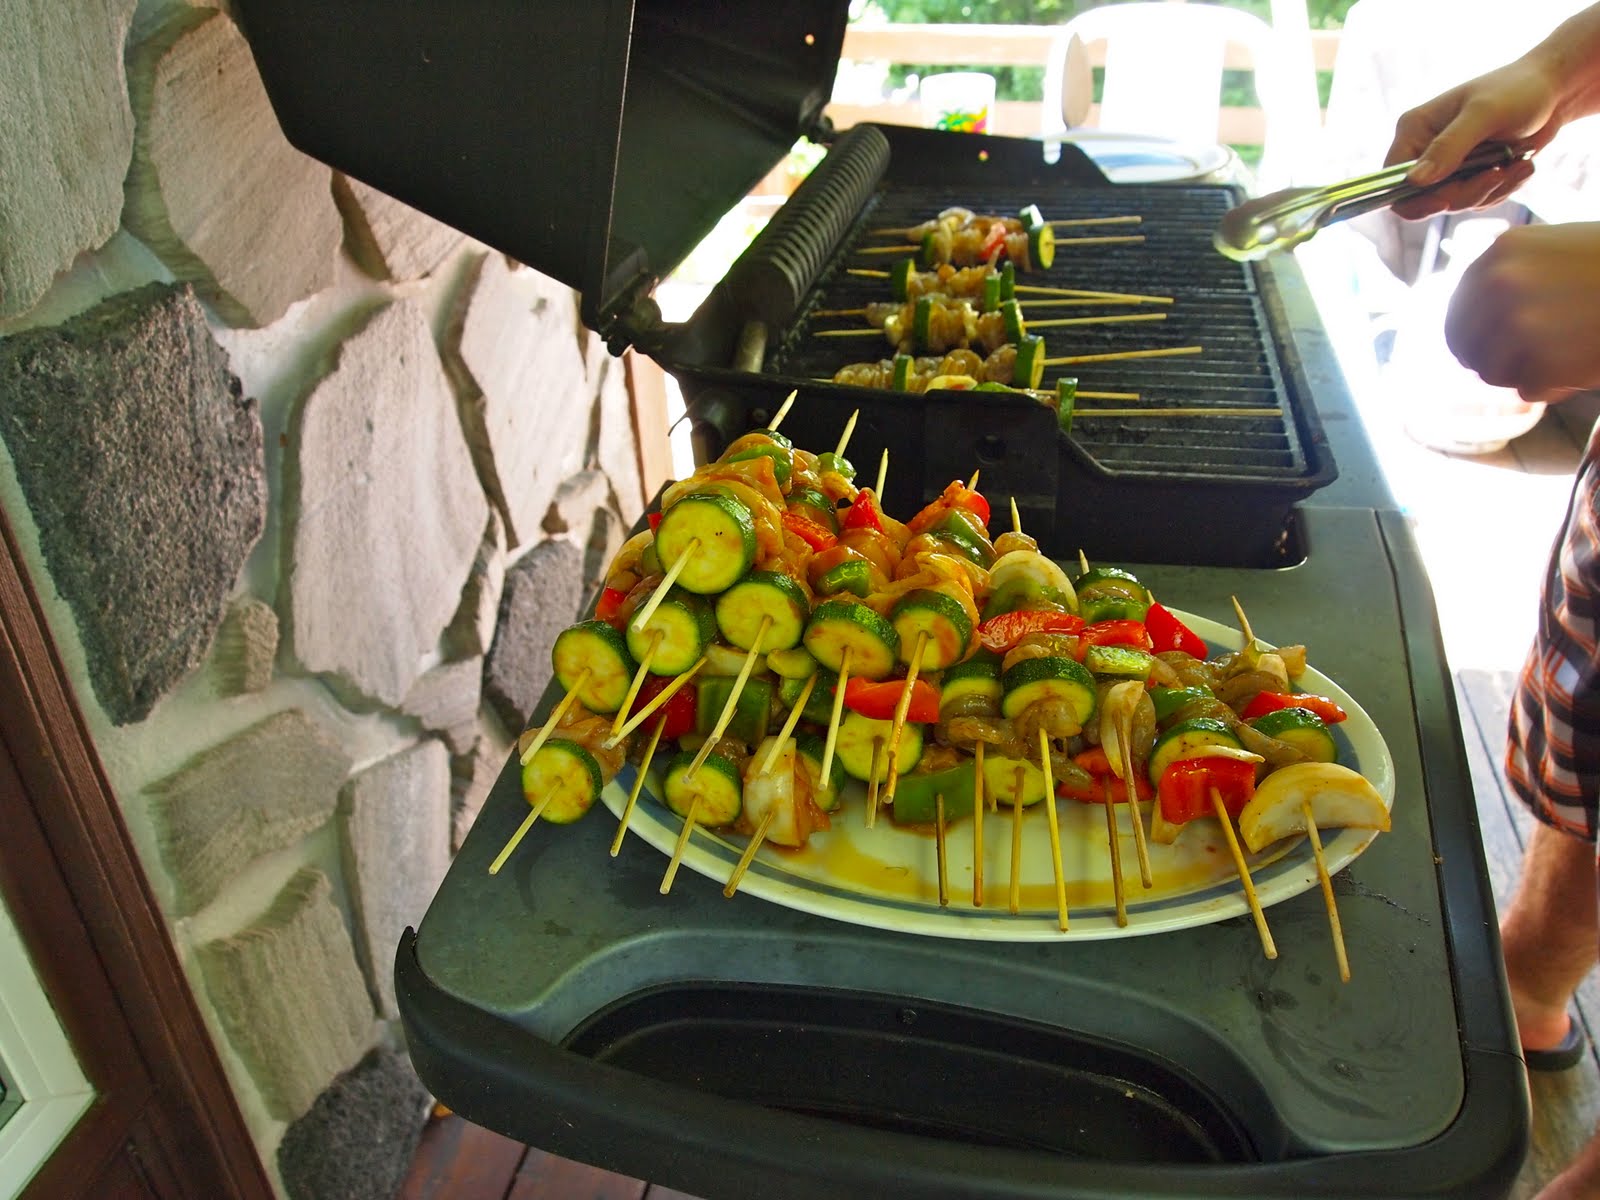
Before we left for our cottage adventure, CK came up with a great plan for feeding us right: we adjusted a recipe she found in a magazine to suit our group's budget and tastes, and came up with this winner! The quantities on this one are rough, because it really depends who you're trying to feed - our menfolk ate easily three times are many skewers apiece as we did. That being said, we served 6 people for about 6$ a head (including the
pasta salad). We made around 40 skewers with this quantity of marinade, but that included a bunch that were just shrimp, without veggies. These, as it turns out, are a big hit, so when you run out of veggies and chicken, begin skewering just shrimp, and you will be everyone's favorite.
Marinade: (Note: Because I don't eat chicken, we split up our shrimp and chicken into different batches, dividing this amount of marinate between two bowls, and divvying up the veggies accordingly as well)
 |
| Props to Remy: Our host and a master griller! |
In a large bowl (you'll be putting your chicken shrimp and veggies in here too) mix together...
3 tbsp
ketchup
3 tbsp
soy sauce (try to get reduced sodium)
3 tbsp
sugar
1.5 tbsp
apple cider vinegar
Skewer ingredients:
- 3 small zucchinis, chopped into rounds
- 1 green pepper, deseeded and chopped into chunks
- 1 red pepper, likewise
- 1 sweet onion (we used the leftovers from the pasta salad), cut into chunky wedges
- An orange pepper would be a nice addition too, chopped into chunks
- 1 bag frozen deveined shrimp (ours was a bag of 60-70 shrimp) - if you can buy them uncooked with tails off, power to you. Or, you can spend a good 15 minutes taking the tails off these babies if you REALLY love your guests).
- 4 chiclen breasts, cut into chunks

Mix skewer ingredients into marinade (whether you keep' em separated or not), and let sit for about 15 minutes. If you like your skewers really juicy, set aside a few spoonfuls to brush onto the cooked skewers. Skewer ingredients onto sticks, alternating meat with vegetables for as long as possible. Grill on the BBQ for about 4 minutes each side. Serve immediately. Pairs nicely with the
Picnic-Perfect Pasta Salad!Grill on!
-A
at 7/25/2011 04:28:00 PM
Posted by amanda in
budget,
celery,
cucumber,
dill,
dressing,
easy,
feta,
healthy,
onion,
pasta,
pasta salad,
pepper,
quick,
recipe,
salad,
spinach,
tomato,
vegetarian,
yellow pepper
It's summer tiiiimmmme and the cooking is eeeeaasy here at Stute-kitchen :) Team Stute has returned from a fantastic weekend away at a cottage with good friends, gorgeous weather, and GREAT food. Combining our forces we came up with a delicious cottage-time lunch: pasta salad and barbecued skewers. Fresh ingredients and a new spin on these old classics takes traditional summer food to a new level of goodness.
You're gonna need:

- Roughly 2 generous cups of uncooked shell (conchiglie) pasta
- One yellow pepper, seeded and cut into slim chunks (or however you like your pepper in a salad), if you go really chunky, use 2 peppers
- Half a cucumber, sliced into half circles
- 2-3 stalks of celery, diced roughly
- 1 pint (usually a container) of cherry or grape tomatoes, halved
- 1/4 of a sweet onion (though any kind would likely do, this salad gets more onion-y the longer it exists, so choose wisely), finely chopped
- 3 tbsp fresh dill, chopped
- 3-5 generous handfuls of baby spinach (mixed greens will do in a pinch, but they don't keep as long once the dressing is mixed in).
Dressing: Whisk together...
1/2 cup
olive oil
1/2 cup
lemon juice
2 heaping tbsps
Red Wine Vinegar
1 clove of
garlic, minced
Ground Black Pepper to taste
Topper:
Roughly 1.5 cups of light
feta cheese -though really, add as much or a little as you like - , rinsed, dried, and crumbled (my new technique is to rinse the block from the brine, and then squeeze the liquid out in my fist, over the sink - this dries and crumbles simultaneously, then you can just brush your hands off in the salad)
To assemble:
1. Cook the pasta (roughly 8-10 minutes to get it al dente), rinse in cold water, and set aside.
2. Combine all your veggies, except the spinach, in a large bowl, using your hands to mix gently, being
sure to distribute the dill.

3. Add pasta to veggies, again, stirring with hands.
4. Add spinach by handful, assessing how much or how little you will want personally. Mix with hands (this avoids breaking the pasta shells)
5. Pour dressing over pasta and veggies (if you don't like getting oily, use a utensil here, but I swear, hands is the way to go)
6. Chill.
7. Crumble feta into salad before serving. Mix.
This makes roughly 10 servings, depending on the appetites in the room. Be sure to wait 20 minutes or so before hitting the lake!!!
-A
Monday, July 18, 2011 at 7/18/2011 11:50:00 AM
One of my lady friends is getting married in a few months and her cooking is sure to please her husband-to-be! I've always wanted to try a lasagna but always hated the prospect of a very long preparation process. Lucky for me, her recipe makes cooking lasagna fun, healthy and faster than anticipated! :) Without further ado, please go to the store and get yourself:
![]()
- 3 1/2 tbsp of olive oil
- 2 packs of ground turkey
- 1/2 white of spanish onion (diced)
- 2-3 garlic cloves
- 1 large can of diced tomatoes
- 1 large can of crushed tomatoes
- 1 tbsp of Italian spices (unless your diced tomatoes already have Italian spices in them)
- 3-4 fresh basil leaves
- 1 small pack of sliced mushroom
- 2-3 handfulls of spinach
- 9 pieces of whole grain lasagna
- 1 full container of cottage cheese
- mozarella and parmesan cheese
- pepper to taste
1. Heat about 11/2 tbsp olive oil in a large frying pan and cook the packs of ground turkey, adding a little bit of pepper to taste
2. At the same time heat 2 tbsp olive oil to a large sauce pan and add 1/2 white of spanish onion (diced) and 2 or 3 finely chopped garlic cloves.
3. Once onions are brown, add 1 large can of diced tomatoes and 1 large can of crushed tomatoes (if you have the original diced tomatoes, add the Italian spices).
4. Add the fresh basil leafs, sliced.
5. Bring sauce to a boil and add turkey.
6. Separately, cook the small pack of sliced mushroom and the spinach on low heat in a medium sized covered frying pan. You can coat the pan with a small amount of olive oil to avoid sticking, but these veggies produce a lot of water when heated. Remove cover after 5 minutes. Cook until desired consistency.
7. Boil 9 pieces of whole grain lasagne (cooking an extra piece is not a bad idea)
8. Layer 3 pieces of lasagna over a thin coat of sauce. Over the paste, place a think layer of the meat sauce. Place 3 more pieces of lasagna over the sauce and top with the cottage cheese. Top the cottage cheese with the mushrooms and spinach. Place 3 last pieces of pasta and top with mozzarella and fresh grated parmesan.
9. Heat oven at 350 degrees and bake uncovered for 20 minutes or until cheese is golden and extra sauce evaporated.
Enjoy! It's absolutely fantastic!
- CK
Monday, July 11, 2011 at 7/11/2011 02:32:00 PM
On my way back from vacation last week, I picked up a copy of this month's
Women's Health Magazine and stumbled upon a great article about how to make good, healthy, refreshing salads. Here's a quick salad recipe I put together based on the suggestions from the article (While I couldn't find the electronic version of this article, I found
very similar salad tips on the Women's Health website). I also found a very good honey
balsamic vinegrette to top up the salad. It turned out filling and most importantly - delicious! :)
Ingredients (for 1 large portion):
- a few shrimp (I had about 10 small-medium sized shrimp)
- half an avocado
- 3 hand fulls of baby spinach
- 1/3 of red pepper, chopped
- half a tomato, diced
- 1 tablespoon of crushed walnuts
One simple step: Mix it all together!
Vinegrette Recipe:
- 1/2 cup balsamic vinegar
- 1/4 cup honey
- 1/4 cup olive oil
- 1 teaspoon soy sauce
Wisk all together!
I only put about 3 teaspoons on my salad before eating, but you can easily cut it down to 2 and you'd still get the amazing taste. Refrigirate the rest so you can use it another time!
Enjoy!
- CK
Tuesday, July 5, 2011 at 7/05/2011 05:59:00 PM
With local temperatures closing in on 40 after the humidex, the only appliance I want to use in my kitchen is the food processor. Likewise, this deep heat has me opting for effortless and cooling snacks like veggies and dip. Unfortunately, most store bought dips are full of lots of strange chemical compounds which, though delicious, probably shouldn't hang out in our bellies in too-large quantities. Luckily however, making your own veggie dip is easy, faster than going to the store, and ultimately probably even cheaper than the 4$ you'll shell out on something containing words you can't pronounce.
This dip is best if given time to sit in the fridge overnight. It's great on potatoes, (AND, I hear, steak) and probably on lots of other things. Right now I'm eating a bowl of baby spinach with a dollop of it: maybe it's the heat, but it's pretty delicious on just about everything.

In a food processor combine:
equal parts low-fat cottage cheese and plain yogurt (fat content of your choice - I'm on a full-fat low-sugar yogurt kick and am loving it)
as much washed and chopped fresh dill as you like (for a total of 1.5 cups of cc and yogurt, I used 3 tbsp)
a few dashes of onion powder or garlic powder or both, or none, to taste
crack some pepper in there and whip it up until combined!
Chill overnight.
Another great use for this dip is in a super quick satisfying cold veggie snack:
mix one generous dollop of dip into about half a cup of veggie ground round (meatless ground beef)
pour mixture on bed of fresh baby spinach, combine
EAT!
Wednesday, June 29, 2011 at 6/29/2011 11:37:00 AM
![]()
This traditional Lebanese dish is so delicious and yet always seems to be take such a large amount of effort. Last night however, I decided to embrace my Lebanese roots and stop complaining about the effort it takes to make what I think is a trademark of the Lebanese tradition. That's when I came to realize it really only takes about 10 minutes to make taboule - at least to make 1-2 portions.
Note that this taboule is the real deal. The ones you find in stores with A LOT of bulgar are not good verisons of taboule ;)
Here's what you'll need:
- 1 bunch of parsley
- half a tomato - chopped into cubes
- 1/4 of an onion - chopped into cubes
- 1tbsp of bulgar (for lack of bulgur at my house, I used 2 pinches of cooked couscous because it doesn't really taste the same)
- 1/2 tbsp of olive oil
- 1/2 tbsp of lemon juice
*add olive oil or lemon juice to taste.
Preparation:
- Chop the stems off the parsley bunch then chop the parsley into tiny little pieces
- Add the chopped tomatoes, chopped onions, olive oil, lemon juice and bulgar
- Mix well.
*If you're not going to serve right away, hold the olive oil and lemon juice. Add and mix right before serving only.
THAT'S IT!!!!
Enjoy!
-CK
Thursday, April 14, 2011 at 4/14/2011 09:22:00 AM
Well the end of the semester is upon me. That boatload of essays and tests, not to mention the planning of our upcoming trip to Amsterdam in May, has really taken a cut from my buying-food-dressing-it-up-and-eating-it-time. Not to mention that the playoffs started last night, and for reasons I still don't understand, this means I will be glued to the set for a few hours most nights, already shirking my other responsibilities, not to mention my belly.
So, out of a despair-inertia-hunger cocktail, last night, I put the three things in my kitchen together to make a surprisingly not embarrassing dinner, an iron and protein packed staple that may have made its way into my heart for good.
For two meal-sized servings, in all of 5-6 minutes, you will need;

- 1 can chili-style beans (Heinz) - however, it is my firm belief that kidney beans with a little seasoning of your choice would cut it too, or even white beans fried in garlic, though that would more closely resemble an earlier post.
- a few generous handfuls (4-5) of fresh spinach, prefereably baby, cleaned
- A dollop of cold, plain yogurt. My favorite is Astro's balkan style.
- optional garlic for frying (may be more relevant if you don't have the seasoned beans already)
- Enough olive oil to go once around your pan.
- Above mentioned frying pan/skillet
Go for it:
- Heat the olive oil in your skillet, at medium heat.
- Toss in your beans (rinsed and seasones, unless you are using the chili style beans); heat until almost sizzling. Try not to mush them too much.
- Lay a thick layer of fresh spinach over the hot beans.
- Allow the spinach to wilt enough to turn it over, into the bean mix so it's under some hot beans.
- Repeat with a new layer of spinach, twice, or until all your spinach is used up.
- Remove from the heat. I like to leave my last batch of spinach more still a bit fresh, to vary the texture.
- Split your total into 2 servings. If you are saving one for another day, let it cool before sticking it in the refrigerator, though I do recommend putting it in tupperware speedily so the beans don't get stuck to your pan. That serving can be microwaved later, or tossed back into a skillet to heat. Serve what you are eating in a bowl.
- Drop a large dollop of plain yogurt into the middle of your beans; salt the yogurt slightly if you like.
No need to let cool, because the yogurt will do this for you.
And voila! Iron, protein, probiotics, calcium, and innumerable other health necessities, in a really hearty couch-worthy dinner (just make sure you don't spill any!)
Wednesday, March 30, 2011 at 3/30/2011 09:54:00 AM
Certainly the last few weeks have been a succession of historical moments in international history, but March will surely be remembered more for Japan's devastating tsunami-earthquake disaster than anything else. My friend Zach was on the ground in Tokyo the day of the earthquake, and began to keep
a very informative and insightful blog cataloguing his experience in Japan, including photographs, in a way that no news coverage can communicate. Despite Zach's even calm and ever-grateful demeanor,
the blog is moving and is at all times an incredibly personal account that makes room for the community as well as perhaps bringing to light some of the concerns and conflicted emotions felt by many people in Japan. Zach has made his way to China, and will be returning to Japan when he can
Click here.
Tuesday, March 15, 2011 at 3/15/2011 12:42:00 PM

As you may have noticed, I am NOT a bean person (and talk alot about it). Which is why I was never a big chili fan. However, on my quest to start liking beans again (cuz you know...it's healthy), I have forced myself to try a good meaty chili (i.e. Tim Horton's) and actually enjoyed the taste! In light of this, C and I tried a tofu chili yesterday - different from amanda's
Barely Vegetarian Chili - which I was quite impressed with! Found
here, I had to ommit some of the ingredients as I always try to make things with what I have in my fridge/cabinets/wallet.
Ingredients:
- 1 large yellow onion
- 4 large stalks celery
- 3 cloves garlic
- 2 diced tomatoes
- 14 oz. can of tomato soup
- 14 oz. can black beans
- 1 cake low fat extra-firm tofu
- half a box of white mushrooms
1. The night before you want to eat this chili, prep your ingredients by cutting up all the vegetables and put them in a bowl. Refrigerate.
2. The next morning before you leave for work/school/whatever it is you do, dump everything in your crockpot (including beans, tofu and tomato soup)
3. Heat on low for 6-8 hours.
4. Enjoy this hearty meal when you get back home!
Enjoy!
-CK
Friday, March 11, 2011 at 3/11/2011 10:38:00 AM
Did you ever wonder if Popeye only ate his spinach straight from the can, or did Olive sometimes cook for him? Well, if she did put on an apron and had a short 20 minutes to spare, I'm sure that this recipe would've been a winner!
I had never thought of mixing potatos and spinach together, until I came across
this potato and spinach salad recipe (the link is odd as you can't link to this particular recipe, you actually have to look for it). It is absolutely fantastic! Great to fill you up for lunch/supper but also great if you're invited to a potluck and you've got a case of I-don't-have-time-to-make-something-but-I-have-to-bring-something. You can bring the ingredients over and take 20 minutes to make it! :)
To make a salad that serves 3 somewhat good portions, GET:
- 3 large Russet potatoes
- 1/4 cup of spinach (defrosted)
- 2 teaspoons mayo
- 1 squirt of mustard
- If you have time, boil your potatoes until soft. I cleaned them first then microwaved them for about 15 minutes because I didn't have time to boil them.
- Defrost your spinach in the microwave
- While your spinach is defrosting, cut your potatoes into cubes (or whatever shape you like them in), I like to leave the skin on, but do whatever your heart desires.
- Mix your potatoes, spinach, mayo and mustard.
- THAT'S IT!
It turned out succulent and a little sweet too! It's quite fantastic! :)
Enjoy!
-CK
Friday, March 4, 2011 at 3/04/2011 10:43:00 AM

I'm not a Toronto girl, at all, but every once in a while, something happens to make me wish I were. This year, that thing is Hot Beans, a one-of-a-kind latin-inspired vegan take-out place that has recently opened at
160 Baldwin in Toronto's Kensington Market. The brain-child of partners
Ross, Madeleine, and Scott, this new vegan mecca promises to make vegan dreams of late night burritos and donuts come true, against all odd. Because I can't be there, I think you should. Check them out at their
Facebook page or follow them on
Twitter . Here is some of what they have to offer:
 |
| Vegan Donuts! |
 |
| Tacos!! And biodegradable plastic! |
 |
| Hearty vegan Burritos! |
at 3/04/2011 09:57:00 AM
YUMMY. Last night I actually had time to cook a nice dinner for M and I and it turned out great! Believe it or not, I actually found this recipe on a
parenting website (no worries A, I wouldn't tell you on a blog ;)). The recipes on family websites are usually very little time-consuming (takes about 45 minutes from start to finish) and delicious as it needs to please the kids. This one was no exception! Although frying eggplants is not the best for your health calorie-wise (as it absorbs most fat and adds a hell of alot of calories in the process), you'd be fine eating small portions of it. Besides, this recipe is so packed with ingredients that you won't need a big portion to fill up that belly! :)
Ingredients:
- 1 lb dry pasta
- 6 links of your favorite pre-cooked sausage (beef, pork or chicken) (I used 3 large sausages that were on sale at Super C - the ones we use for the bbq - instead of 6 links of sausage)
- Extra-virgin olive oil
- 1 onion, chopped
- 2-3 cloves garlic, chopped
- 1 large eggplant cut into 1-inch pieces (you'll see that this might look like ALOT of eggplant when you cut it up, but it's actually very proportional)
- 2 tablespoons of dry basil (the original recipe calls for fresh basil but I didn't have any and it still tasted awesome)
- 1 1/2 cups shredded mozzarella cheese
- Pepper
- 1 can of Aylmer tomato soup
- 1 small can of tomato paste
- 1/3 cup of water
- 1 cup Parmesan cheese (optional - I didn't have any)
- Bring a pot of water to a boil and cook pasta only 6-7 minutes. It will be firm (and will soften when it's baked).
- While waiting for water to boil, chop the sausages (into big pieces) and the onion and garlic. Cook together in olive oil in a skillet 3-4 minutes (they'll cook further when baked). Put sausages, onion and garlic in a large casserole dish.
 In the same oil fry as many eggplant pieces as you can fit. Cook until both sides are browned and then add eggplant to casserole. Repeat with all of the eggplant pieces, adding more oil when necessary.
- Add the cooked pasta (drained) and ½ cup of the pasta water to the casserole. Add the basil to casserole and add 1 cup of mozzarella. Grind in some black pepper.
- In a mixing bowl, pour the tomato soup, the tomato paste and the water and mix well. Pour in pasta casserole. Stir until all ingredients are combined.
- Optional: Sprinkle remaining cup mozzarella and Parmesan over pasta.
- Cover with foil and refrigerate if making ahead, or immediately bake at 450 degrees for 15 minutes.
I would like to apologize for the picture - it's not the best for this dish but take my word for it, it's absolutely amazing! I got my sausages a little spicy so it gave an extra
umph to the dish!
Enjoy!
-CK


 Wow! It's been a while since we posted a recipe on the blog! This summer has been a hectic one for all of us here at Stute Kitchen! So much so that we barely even had time to cook! But fall is here and warm and cozy recipes are definitely on the menu. To start off the parade, here's a great recipe that was thrown together last night for supper and turned out to be delicious! :)


 Before we left for our cottage adventure, CK came up with a great plan for feeding us right: we adjusted a recipe she found in a magazine to suit our group's budget and tastes, and came up with this winner! The quantities on this one are rough, because it really depends who you're trying to feed - our menfolk ate easily three times are many skewers apiece as we did. That being said, we served 6 people for about 6$ a head (including the pasta salad). We made around 40 skewers with this quantity of marinade, but that included a bunch that were just shrimp, without veggies. These, as it turns out, are a big hit, so when you run out of veggies and chicken, begin skewering just shrimp, and you will be everyone's favorite.

 Mix skewer ingredients into marinade (whether you keep' em separated or not), and let sit for about 15 minutes. If you like your skewers really juicy, set aside a few spoonfuls to brush onto the cooked skewers. Skewer ingredients onto sticks, alternating meat with vegetables for as long as possible. Grill on the BBQ for about 4 minutes each side. Serve immediately. Pairs nicely with the Picnic-Perfect Pasta Salad!


 As you may have noticed, I am NOT a bean person (and talk alot about it). Which is why I was never a big chili fan. However, on my quest to start liking beans again (cuz you know...it's healthy), I have forced myself to try a good meaty chili (i.e. Tim Horton's) and actually enjoyed the taste! In light of this, C and I tried a tofu chili yesterday - different from amanda's Barely Vegetarian Chili - which I was quite impressed with! Found here, I had to ommit some of the ingredients as I always try to make things with what I have in my fridge/cabinets/wallet.
  In the same oil fry as many eggplant pieces as you can fit. Cook until both sides are browned and then add eggplant to casserole. Repeat with all of the eggplant pieces, adding more oil when necessary.

